Notice
Recent Posts
Recent Comments
Link
| 일 | 월 | 화 | 수 | 목 | 금 | 토 |
|---|---|---|---|---|---|---|
| 1 | 2 | 3 | ||||
| 4 | 5 | 6 | 7 | 8 | 9 | 10 |
| 11 | 12 | 13 | 14 | 15 | 16 | 17 |
| 18 | 19 | 20 | 21 | 22 | 23 | 24 |
| 25 | 26 | 27 | 28 | 29 | 30 | 31 |
Tags
- 구루미biz
- 3D모델링
- Premiere
- 3D modeling
- 볼트 모델링
- 구루미비즈
- micro-bit
- 3D프린팅
- 3d
- 구루미biz(gooroomeebiz)
- 3D PRINTING
- 서울마이소울
- 22ww.tistory.com
- 3Dprinting
- suno
- 무드등
- laserutting
- BrainCar
- 3D 모델링
- LayerCutting
- 레이저커팅
- seoulmysoul
- 3dmodeling
- lasercutting
- ChatGPT
- 프리미어
- fusion360
- FUSION 360
- 구루미 장애사항
- 구루미 고객센터
Archives
- Today
- Total
CodingMaker
3 가변저항, LCD 제어하기 본문
가변저항값 확인하기
|
1
2
3
4
5
6
7
8
9
|
void setup() {
Serial.begin(9600);
}
void loop() {
Serial.println(analogRead(A0));
//delay(100);
}
|

I2C 통신 https://m.blog.naver.com/darknisia/220669400101
I2C 주소 스캔하기
I2C_Scanner.zip
0.00MB
|
1
2
3
4
5
6
7
8
9
10
11
12
13
14
15
16
17
18
19
20
21
22
23
24
25
26
27
28
29
30
31
32
33
34
35
36
37
38
39
40
41
42
|
void setup()
{
Wire.begin();
Serial.begin(9600);
while (!Serial); // Leonardo: wait for serial monitor
Serial.println("\nI2C Scanner");
}
void loop() {
byte error, address;
int nDevices;
Serial.println("Scanning...");
nDevices = 0;
for(address = 1; address < 127; address++ )
{
Wire.beginTransmission(address);
error = Wire.endTransmission();
if (error == 0) {
Serial.print("I2C device found at address 0x");
if (address<16)
Serial.print("0");
Serial.print(address,HEX);
Serial.println(" !");
nDevices++;
}
else if (error==4) {
Serial.print("Unknow error at address 0x");
if (address<16)
Serial.print("0");
Serial.println(address,HEX);
}
}
if (nDevices == 0)
Serial.println("No I2C devices found\n");
else
Serial.println("done\n");
delay(5000); // wait 5 seconds
}
|
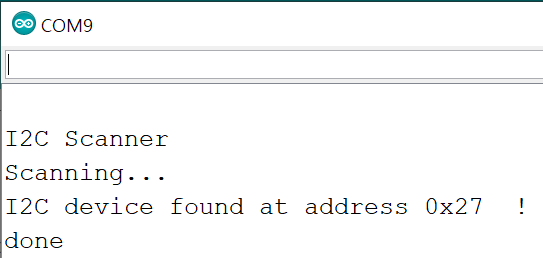
업로드 하고 시리얼 모니터를 켠다 (0x27 확인한다.)
|
1
2
3
4
5
6
7
8
9
10
11
12
13
14
15
16
17
18
19
20
21
22
23
24
25
26
27
28
29
30
31
32
33
34
35
36
37
38
|
#include
#include
LiquidCrystal_I2C lcd(0x27, 16, 2);
void setup() {
lcd.init();
lcd.backlight();
}
void loop() {
lcd.clear();
lcd.cursor();
lcd.blink();
lcd.setCursor(0, 0); //0행, 0열
lcd.print("Good morning~");
delay(2000);
lcd.setCursor(0, 0); //0행, 0열
lcd.print("Good afternoon~");
delay(2000);
lcd.setCursor(0, 0); //0행, 0열
lcd.print("Have a good time");
delay(2000);
lcd.setCursor(0, 0); //0행, 0열
lcd.print("01234567890123456789");
delay(2000);
lcd.clear();
lcd.setCursor(0, 0); //0행, 0열
lcd.print("한글 나올까?");
delay(2000);
}
|
시리얼 모니터에서 입력받은 숫자를 lcd 화면에 출력하는 코드
|
1
2
3
4
5
6
7
8
9
10
11
12
13
14
15
16
17
18
19
20
21
22
23
24
25
26
27
28
29
30
31
32
33
34
35
36
37
38
39
40
41
42
43
44
45
46
47
48
49
50
51
52
53
54
55
56
57
58
59
60
61
62
63
64
65
66
67
68
69
70
71
72
73
74
75
76
77
|
/*
제목 : I2C LCD 제어하기
내용 : 시리얼 모니터를 통해 입력 받은 데이터로 LCD를 제어해보기
이 소스코드는 kocoafab에서 작성하였습니다.
소스코드 배포시에는 출처를 남겨주시기 바랍니다.
E mail : contact@kocoa.or.kr
*/
#include
#include
LiquidCrystal_I2C lcd(0x27, 16, 2); // I2C LCD 객체 선언
void setup()
{
lcd.init(); // lcd를 사용을 시작합니다.
Serial.begin(9600);
lcd.print("Hello Everyone"); // lcd 화면에 출력
lcd.home(); // cursor의 위치를 0,0으로 이동
}
void loop() {
if (Serial.available()) { //시리얼 모니터를 통해 들어오는 데이터가 있다면
char data = Serial.read(); // 데이터를 data 변수에 저장
// baklight 테스트
if (data == '1') {
lcd.noBacklight();
delay(1000);
lcd.backlight();
}
// Display 테스트 (글자 표시)
if (data == '2') {
lcd.noDisplay();
delay(1000);
lcd.display();
}
// Cursor Blink 테스트
if (data == '3') {
lcd.blink();
delay(1000);
lcd.noBlink();
}
// Cursor 표시 테스트
if (data == '4') {
lcd.cursor();
delay(1000);
lcd.noCursor();
}
// Scroll 테스트
if (data == '5') {
lcd.scrollDisplayRight();
delay(1000);
lcd.scrollDisplayLeft();
}
// Cursor 위치 변경 테스트
if (data == '6') {
lcd.home();
lcd.cursor();
for (int i = 0; i < 16; i++) {
lcd.setCursor(i, 0);
delay(100);
}
lcd.noCursor();
lcd.home();
}
}
}
|
LCD-serialinput-LCDoutput.zip
0.00MB
거리센서의 거리값을 LCD 모니터에 출력하는 코드
|
1
2
3
4
5
6
7
8
9
10
11
12
13
14
15
16
17
18
19
20
21
22
23
24
25
26
27
28
29
30
31
32
33
34
35
36
37
38
39
40
41
42
43
44
45
46
|
#include
#include
LiquidCrystal_I2C lcd(0x27, 16, 2);
const int trig = 4;
const int echo = 3;
void setup() {
lcd.init();
lcd.backlight();
pinMode(trig, OUTPUT);
pinMode(echo, INPUT);
Serial.begin(9600);
}
void loop() {
int cm = getDistance(); // 거리측정
// 시리얼 모니터에 거리값 나타내기
Serial.print(cm);
Serial.println(" cm ");
// LCD 거리값 표시하기 코드완성하세요
lcd.clear();
lcd.setCursor(0, 0);
lcd.print("Distance:");
lcd.print(cm);
lcd.print("cm");
delay(500);
}
int getDistance() { // 초음파센서로 거리측정하기
digitalWrite(trig, LOW);
digitalWrite(echo, LOW);
delayMicroseconds(3);
digitalWrite(trig, HIGH);
delayMicroseconds(10);
digitalWrite(trig, LOW);
// 초음파로 거리측정(변환)
long duration = pulseIn(echo, HIGH); //초음파 읽기
float distance = duration / 29 / 2; //cm 단위로 변환
return distance;
}
|
LCD-Ultrasonic_baepo.zip
0.00MB
'Arduino' 카테고리의 다른 글
| Serial to USB 사용시 FT232R USB UART 드라이버 설치 문제 (0) | 2020.11.19 |
|---|---|
| NodeMCU (0) | 2019.12.27 |
| 1. 버튼 센서 제어하기 (0) | 2019.11.20 |
| 정전식 터치센서로 LED 켜고 끄기와 스텝모터 움직이기 (0) | 2019.07.31 |
| Fritzing 관련 자료 (0) | 2019.07.05 |
'Arduino' Related Articles
more

